

Share:
What actually is banding?
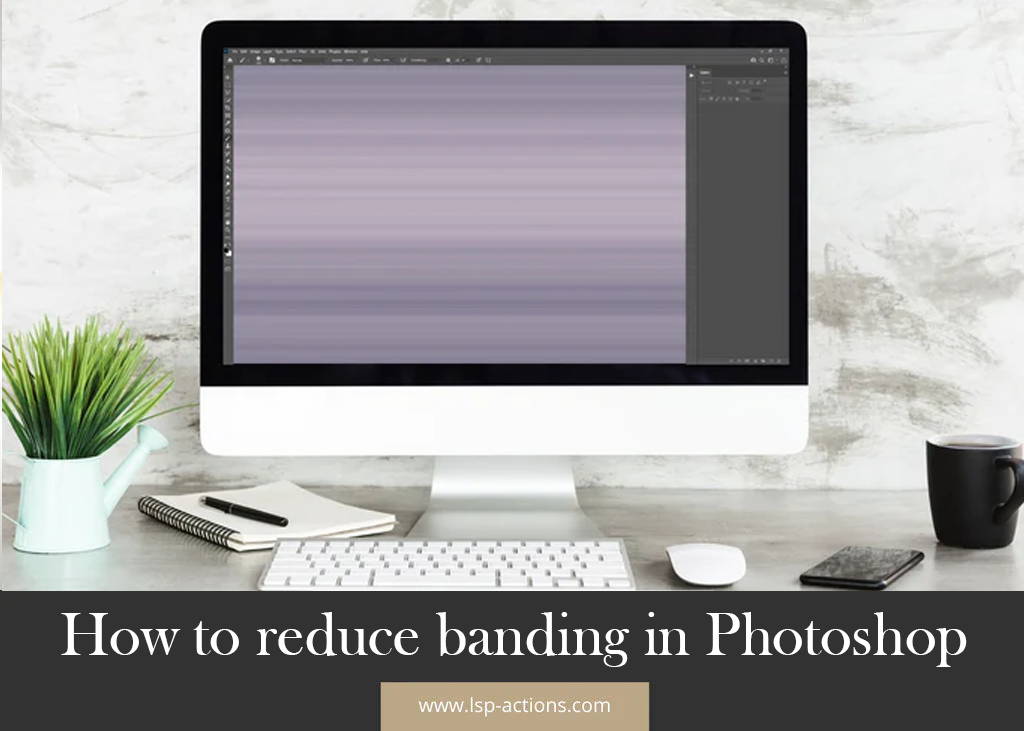
Banding looks like strips or steps of color on your image. This is a form of digital color posterization (try saying that after a glass of wine) and is most noticeable in solid areas of your image that lack detail, such as a seamless paper backdrop for studio photographers or a clear blue sky outdoors.

You may have noticed banding on your TV. Ever watched the opening credits on Netflix and noticed this weird color banding too? This is down to your TV resolution and connection. Again, purely a digital phenomenon. It's a digital rendering of color transitions between those pesky pixels going from dark to light when previewing a version of your image on a screen.
So how do I remove banding?
Fear not, there are several ways you can reduce the banding in your image manually, each method takes a little playing with to get the right option for your image. I've listed 5 ways below to banish the dreaded bands from your pixels. Or you can watch the video [15:22] showing you these 5 ways to manually prevent and remove banding in Photoshop.
Or...
You can DOWNLOAD the Banding Buster Photoshop action >> HERE << This is a powerful mini Photoshop action designed for Photoshop Creative Cloud, so you can effectively reduce and calm unwanted banding artifacts in your images in a few brush strokes, without changing the original image.
How to reduce banding - video guide
How to avoid banding in the first place:
1. Shoot in raw: If you shoot in JPEG, the colors and tones in the image will already be compressed. If you shoot JPEG, your images may include digital banding before you’ve even started to edit! Always shoot and work in raw as this gives you a head start when editing.
2. Work with TIFF or PSD files: no Jpegs! Don’t keep saving JPEGS and reopening. Every time you close and save as a JPEG, the file is compressed a little more from the original. Always work in lossless image formats such as TIFF or PSD until you are absolutely sure you are finished, then you can go ahead and save as a JPEG.
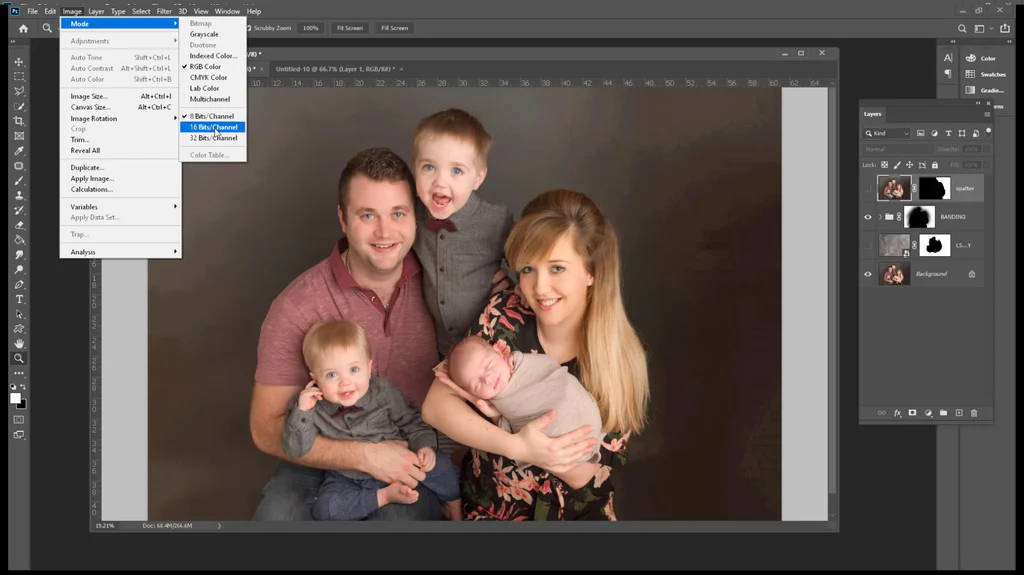
3. Work in 16-bit: You have the option of working in 8-bit color or 16-bit color. Basically, 8-bit files have 256 different colors available, whereas 16-bit has 65,536 colors available to you! This huge difference in quality means 16-bit doesn’t compress the difference between shades so much and can offer much smoother transitions between subtle color changes.
Remember though, 16-Bit images do have a larger file size. You might be cool with this, but if you wish to convert and compress to 8-Bit at the end of your edit, you should be able to do this without noticeable banding - so long as the image is flattened before saving and you've taken concious steps to minimize the banding.
How to check you're working in 16 bit
• IN LIGHTROOM: Go to: Preferences > External Editing > Bit Depth > 16 bits component
• IN CAMERA RAW / ACR: Open the image in ACR and at the bottom of the window, you will see a line of text including your image information. Click this and a panel will open called “Workflow Options”. Click the Depth dropdown and choose 16 Bits/Channel
• IN PHOTOSHOP: Go to: Edit > Color Settings > Check the box that says “Use Dither (8 bit/channel images). Then go to Image > Mode > 16-bit (If you have layers you are working on, choose don’t flatten).
Ok. Did that... but I still see banding!
Once you convert to 16 bit, you will notice a slight difference in the banding, but it may not be a huge difference to begin with to the naked eye, depending on your screen and how Photoshop is rendering the thumbnail preview of the actual image.
This is because of several factors, but mainly because Photoshop is showing you a compressed “working” thumbnail of your image, not the actual full whammy of available pixel data. Photoshop does this for a faster, smoother edit your end.
But the banding will have improved, even if it does not appear so to the naked eye – again, this is because of the compressed image thumbnail you are previewing, not the actual image data.
Try this: ZOOM – zoom in to 100% over the banding. I bet you see it snap into a much smoother transition as the banding vanishes or decreases. Zooming in and viewing the image at 100% will give you a more accurate vision of how your image actually is in real life, not the compressed thumbnail photoshop is showing you. When you zoom back out, the banding will re-appear as Photoshop once again compresses the image you are working on for viewing purposes.
Try this: FLATTEN – Banding will most likely not fully disappear until you have flattened your image, then you should see it magically blend away. Right-click the bottom layer and choose “Flatten” to merge all the layers together into a single image again. Photoshop will dither the banding automatically and you should see it all smooth out and blend much more realistically. Then you can go ahead and save this image as the finished JPEG.
#TIP If you don’t like to flatten the image and are worried about loosing your layers, create a copy of the image and flatten the copy instead (Image > Duplicate). This way you can save a flat version to share and a layered version if you are precious about keeping your layered files.
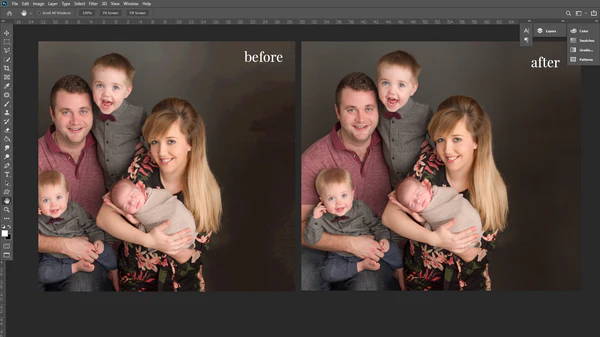
I've done all that, but I still see banding *sob*. How can I cover it up?
Ok, so this means you have some stubborn real banding from your editing process. Sometimes, there will always be a little there (perhaps it really is in your image, normally from repeatedly saving JPEG images and changing the tones a little to much) but more likely it’s a compression issue or something lost quality along the way.
Here are some ways you can cover up the banding:
Add a Gaussian Blur and mask off: This can help some banding, and make other types worse. It all depends on what has caused the banding in the first place. But it’s worth a shot.
Add A Texture Overlay: This is my favorite way of removing banding and is an instant result. Adding a fine art texture not only covers up banding and other background errors but will give your image a stunning fine art finish. You can download the Camden Texture overlay pack here, which also come with actions to help you apply and blend the skin tone
>>> Get the LSP Camden Photoshop textures here <<<
Add noise in Photoshop:
• Layer > New Layer > Change the Mode to “Overlay” and make sure you check the box that says “Fill with Overlay-neutral color (50% gray)
• Hit enter.
• Filter > Noise > Add Noise: Gaussian / Monochromatic. Play with the amount, this depends on your image size. Mask and paint over the banding. Again, this likely won’t be noticeable until you flatten. Watch out for too much noise and grain in your image, I normally stick to around 2-3%
Adding a Spatter Filter in Photoshop – 8-Bit images only. If for some reason you *have* to stay in 8-bit and have not converted to 16 bit, then try this:
• Create a duplicate layer of your image
• Layer > New [enter]
• Ctrl/Command + A to select all
• Ctrl/Command + Shift + C to copy all
• Ctrl/Command + V to paste the image as a new layer
• Move it to the top.
• You may notice that creating a merged duplicate image actually takes the banding down!
• Filter > Filter Gallery > Spatter
• Spray radius: Move this up high, up to 25. Keep the smoothness at 1
• Hit OK
• Add a layer mask to this layer and invert. Using a white brush on the layer mask, paint the spatter effect over the banding taking care not to go over your subjects.
Directly painting over the banding: This can actually create more banding sometimes, so make sure you do so on a new layer and add noise/blur as above if needed.
To see all of these tips in detail, please watch the video above.
To summarize:
Banding can be annoying, frustrating, and a challenge! But don't let it get the better of you. Remember, banding is a digital phenomenon and will barely show, if at all, in print.
Still struggling with banding? You can download my Banding Buster Photoshop action here:

Hi I'm Lauren
Award winning Photographer & editing tutor (plus a mother to to 4 spirited young kids)
I created a suite of editing tools for busy photographers like me who want to transform their images and supercharge their editing. Find out more about these photoshop actions, presets and overlays here.

Save this for later or share
Related Blog Posts