As a photographer, there is nothing more frustrating then battling with a laggy Photoshop interface when trying to edit a gallery.
I'm Lauren Bennett and those who are familiar with me know I'm all about faster editing. This blog is a follow on from the quick & easy post 5 Easy Ways To Make Photoshop Run Faster and delves into the more advanced settings within Photoshop's preferences panel.
There are many performance issues that can cause Photoshop to run slow, crash regularly and lag. In this blog post, I'll show you how to make some changes to your Preferences within Photoshop to speed things up.
How To Optimize Photoshop for Faster Performance
The following changes require you to have the Photoshop Preferences window open.
The next steps below are all going to be done within the Preferences section of Photoshop. I recommend trying one at a time, restarting in-between, and working through them in order until you notice a difference.
Here's how to access Photoshop Preferences:
• Open up Photoshop.
• On Windows go to Edit > Preferences > General
• On Mac go to Photoshop > Preferences > General
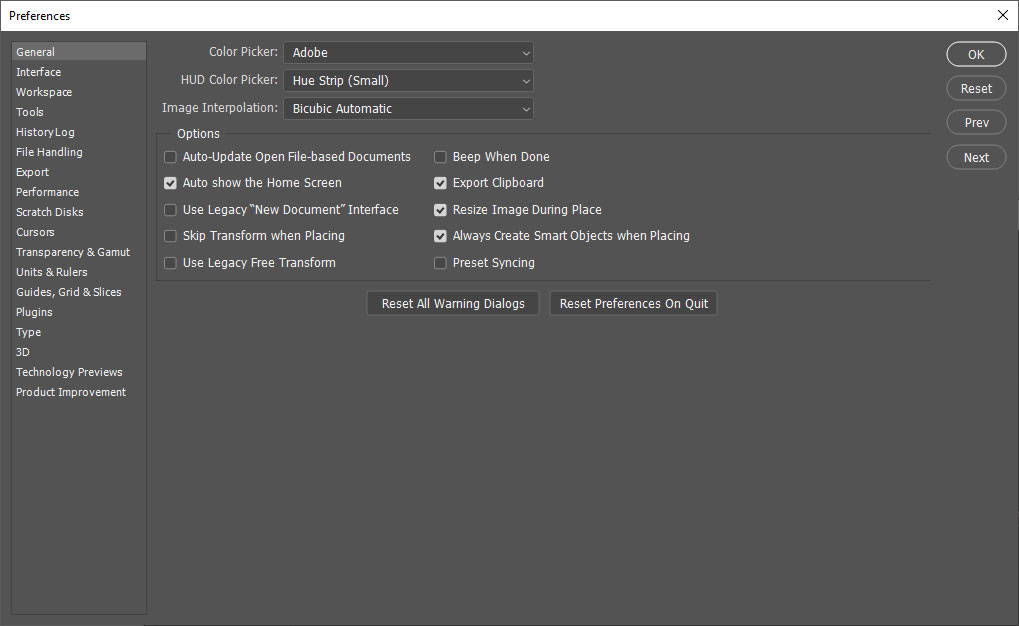
• You'll see this gray box appear with a list of sections down the left side.
Make some simple changes in the Preferences FILE HANDLING Tab:
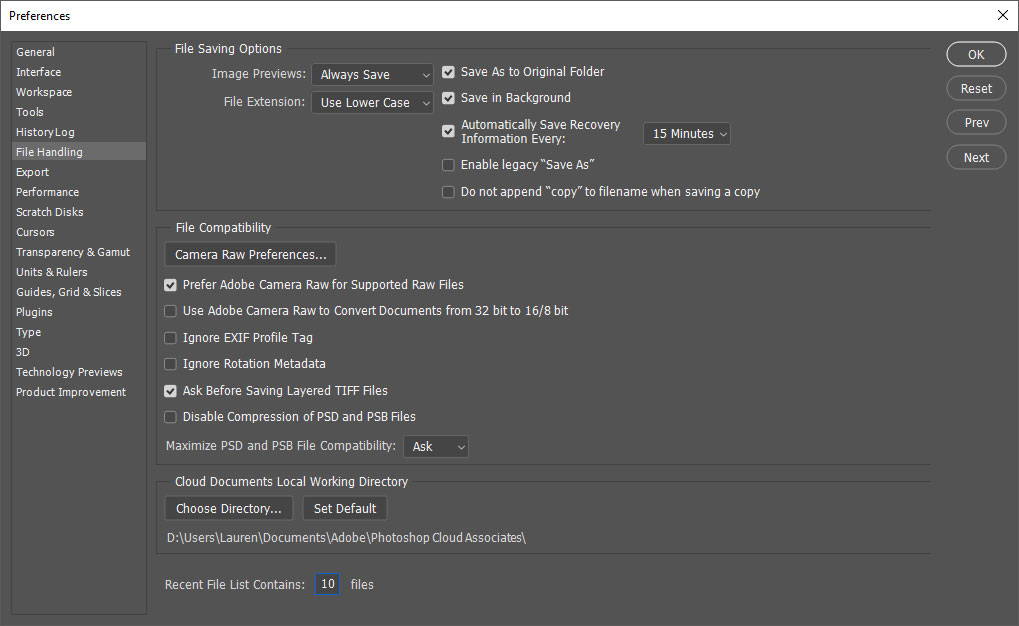
With the Preferences window open, choose "File Handling".
Related Post: How to turn on auto save in Photoshop
It's good practice to save your image regularly as you edit (Control / Command + S) but Photoshop has built-in file recovery which it saves in the background as you go. You can change this auto-save to a longer period of, say, every 15 minutes or more... just make sure you are in the habit of regularly saving and all is good! This stops Photoshop constantly saving your image in the background and frees up memory.
Now it's time to make some changes in the Preferences PERFORMANCE Tab.
MEMORY:
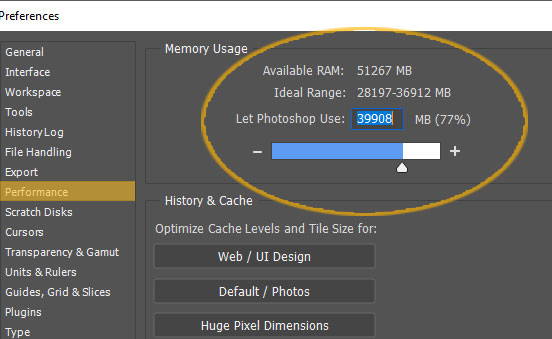
In Preferences, click "Performance" on the left menu. By default, Photoshop is allocated up to 70% of your computer's available RAM.
The Memory Usage area of the Performance box tells you how much RAM is available to your Photoshop. It also shows the ideal Photoshop memory allocation range for your system. You can improve performance by gently increasing the amount of memory/RAM allocated to Photoshop by pushing the slider up a little more. I recommend going up to a max of 80% (try not to go too far above the "ideal range") restarting and seeing how your machine copes with this.
You could always push it to 80% even 85% if you're a risk taker, but see how it goes. Doing this might mean there isn't enough memory left for your computer to perform essential processes. The sweet spot really depends on your individual spec.
HISTORY & CACHE:
In Preferences, click "Performance" again on the left menu.
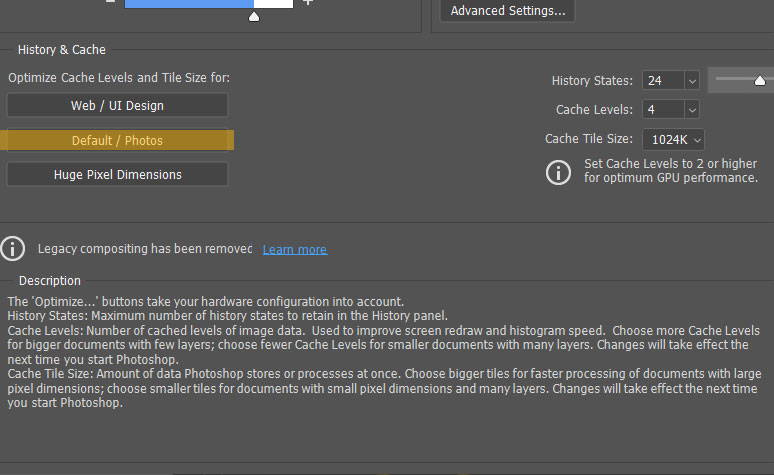
You'll see the History & Cache options below Memory Usage. History means how many of your clicks photoshop saves in the background, so you can "undo" a certain amount of times. The Cache is how often photoshop "redraws" your image as you edit.
Choose "Default / Photos" and change the History states to a smaller number than 50, such as 25. This will speed things up and means Photoshop doesn't have to remember so much.
By default the cache levels will be "4". I recommend leaving this as it is, and the cache tile size too. But if your machine is really struggling, you could lessen cache down to 2.
TWEAK THE GPU (Graphics Processor) SETTINGS:
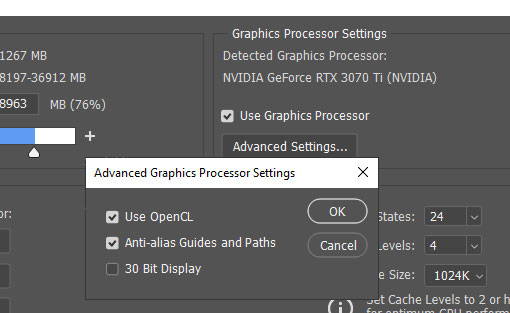
Whilst still in the Performance section of the preferences tab (Preferences > Performance), look over to the Graphics Processor Settings.
You'll be able to see the make and model of your graphics card. Head over to google and type this in, along with the search term "updates" just to double check you don't have any out of date drivers that need updating.
So long as your Graphics Card isn't ancient and is supported by Photoshop, you'll see the "Use Graphics Processor" box checked by default.
Note — If it isn't supported, this box will be grayed out (uh-oh) and could be why your Photoshop is buggy. This is an important memo to upgrade or update your graphics card!
As a last resort, you can turn off the "Use Graphics Processor" check box, and this will make photoshop faster... but you won't be able to rely on tools such as Liquify or the blur gallery which rely on the GPU. But, if all else fails, you can turn off the GPU for a while and see how this works for you. You might find things speed up a lot.
Ideally though, you'll want to keep the GPU on and running. You can click on "Advanced Settings" to fine-tune the GPU settings and un-check the "30 Bit Display" if it's checked.
You can find out more about the GPU setting here on Adobe's website.
Now It's time to streamline your Scratch Disks.
The Scratch Disk is an allocated space, kind of a virtual memory, on your hard drive where Photoshop can save all the temporary or essential things going on in the background (such as history states, temp files, previews, all your layers and caches).
When working with lots of layers, Photoshop is secretly working in the background and chugging away at the memory available to keep your preview current and to remember everything. This is why I always recommend flattening regularly as you go, to keep things clean and tidy.
Ideally, you'll want a separate hard drive in your computer you can dedicate entirely to Photoshop. But this isn't always possible.
To see where the scratch disks are, go to Preferences > Scratch Disks. You can see your drives and see if Photoshop has checked the right box. You can also allocate more than one place so Photoshop has a backup scratch disk.
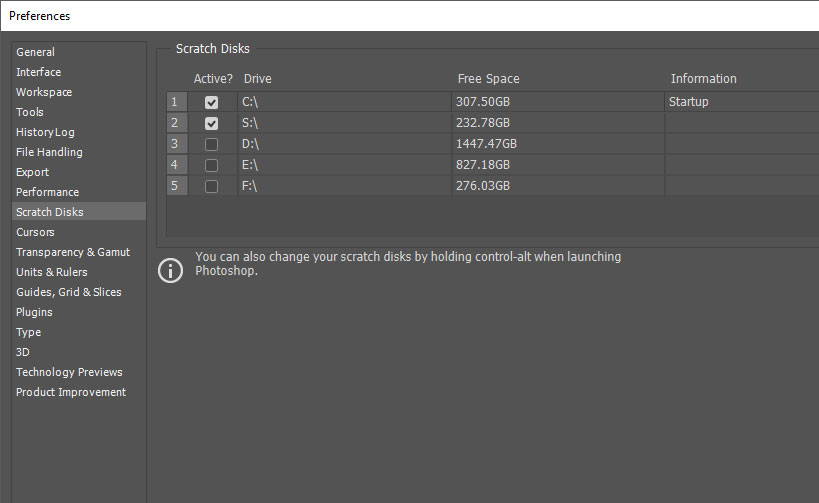
If your scratch disk is full or not being cleaned regularly (Photoshop should do this, but often doesn't, especially if you don't close it properly), then PS will slow down and you might even get the dreaded "Scratch disks full" error code... not good!
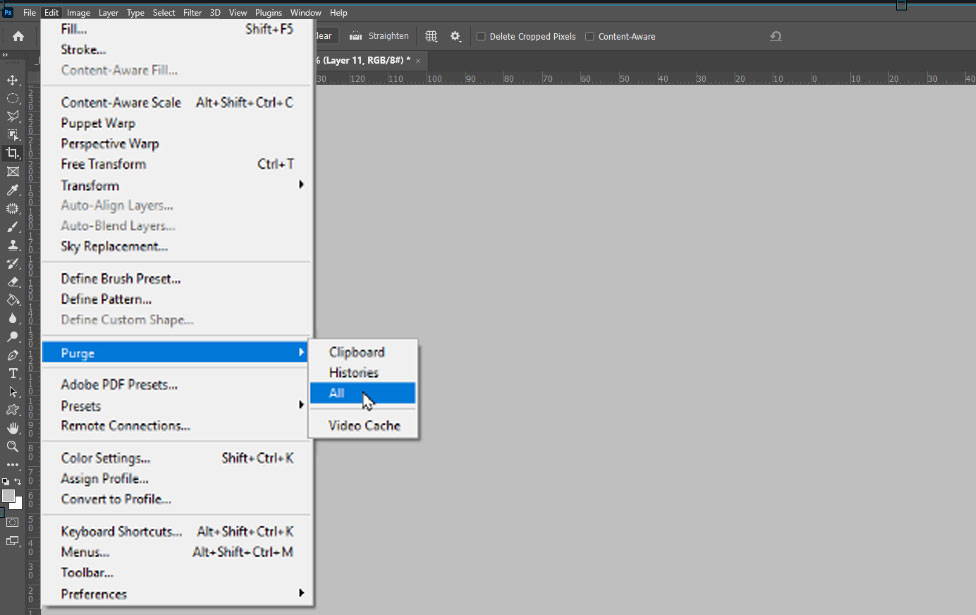
To purge all the data (cache, temp files, history, layers etc) from your scratch disk and start fresh, you can do the following:
• Save your work and close all open images
- unless you're getting the dreaded scratch disk error, in which case leave the images open.
• Go to Edit > Purge > All
This will wipe your scratch disks and give you a clean slate to work with.
If your scratch disk is still full or Photoshop is still grinding away, painfully slow. The last thing you can do is to locate and delete all the old Photoshop temp files.
To find these files, run a search for "Photoshop Temp" files. You'll see these come up as files that begin with "pst" and then random numbers followed by the file extension ".tmp."
Remove these from your drive.
Photoshop may be a little slower initially next time you start up, but this is because it is repopulating some important temp files. This won't last long and you should notice the difference in your scratch disk performance.
Hit restart, open your image and you should notice a big difference in Photoshop's speed and performance.
If at any point you have clicked something that makes it all worse, you can reset your preferences in Photoshop back to the Adobe standard.
Please remember, no matter how many steps you take to speed up Photoshop, none of these steps will help you if your computer is lacking in the tools to run such a huge program. There is only so much you can do with the spec of your computer.
If the above steps haven't helped, it might be time to invest in better spec for your machine, so you can edit faster and put an end to the hours spent waiting for Photoshop to play catch up.
Lauren Bennett
Photographer & Editing tutor at www.lsp-actions.com
PS — Leave me a comment below if you found this helpful or need any further help!
RELATED POSTS: 5 easy ways to make Photoshop run faster | How to turn on Auto Save in Photoshop
